
前言
上一篇分享的:《从单片机工程师的角度看嵌入式Linux》中有简单提到Linux的三大类驱动:
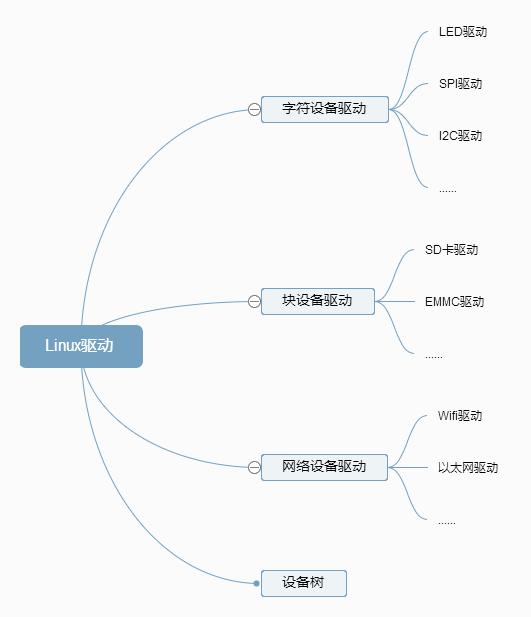
我们学习编程的时候都会从hello程序开始。同样的,学习Linux驱动我们也从最简单的hello驱动学起。
驱动层和应用层
还记得实习那会儿我第一次接触嵌入式Linux项目的时候,我的导师让我去学习项目的其它模块,然后尝试着写一个串口相关的应用。
那时候知道可以把设备当做文件来操作。但是不知道为什么是这样,就去网上搜了一些代码(驱动代码),然后和我的应用代码放在同一个文件里。
给导师看了之后,导师说那些驱动程序不需要我写,那些驱动已经写好被编译到内核里了,可以直接用了,我只需关注应用层就好了。我当时脑子里就在打转。。what?
STM32用一个串口不就是串口初始化,然后想怎么用就怎么用吗?后来经过学习才知道原来是那么一回事呀。这就是单片机转转嵌入式Linux的思维误区之一。
学嵌入式Linux之前我们有必要暂时忘了我们单片机的开发方式,重新梳理嵌入式Linux的开发流程。下面看一下STM32裸机开发与嵌入式Linux开发的一些区别:
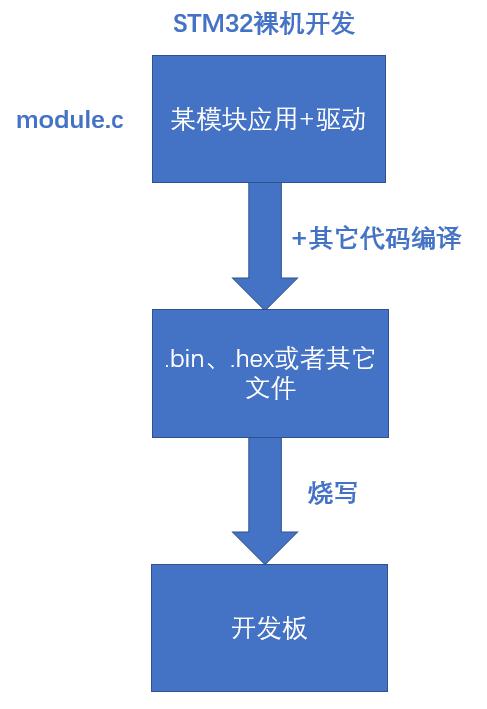
嵌入式Linux的开发方式与STM32裸机开发的方式有点不一样。在STM32的裸机开发中,驱动层与应用层的区分可能没有那么明显,常常都杂揉在一起。
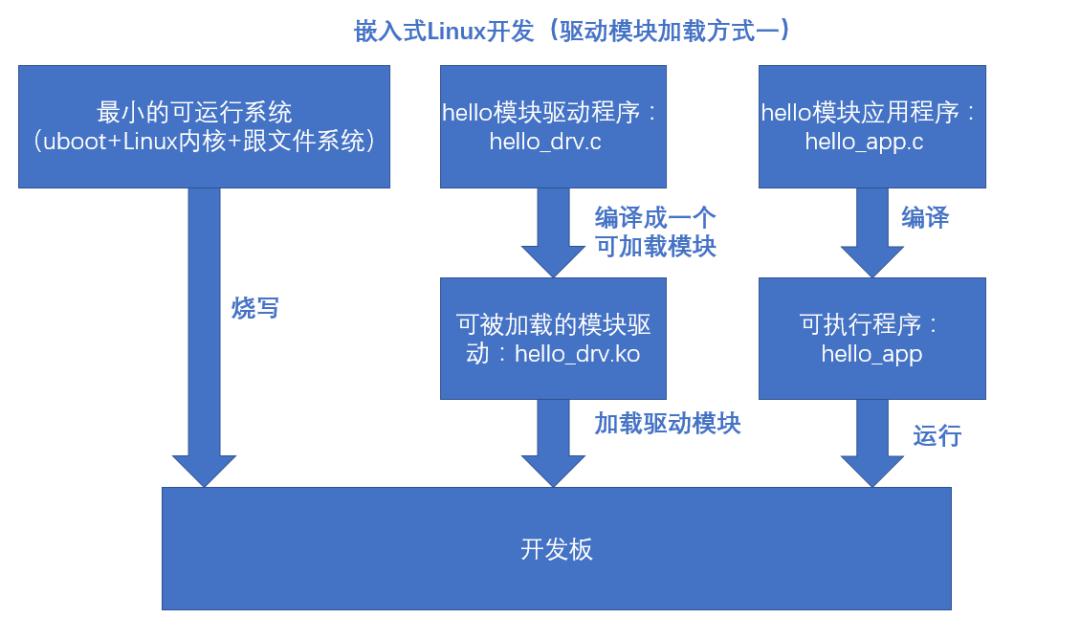
当然,有些很有水平的裸机程序分层分得还是很明显的。但是,在嵌入式Linux中,驱动和应用的分层是特别明显的,最直观的感受就是驱动程序是一个.c文件里,应用程序是另一个.c文件。
比如我们这个hello驱动实验中,我们的驱动程序为hello_drv.c、应用程序为hello_app.c。
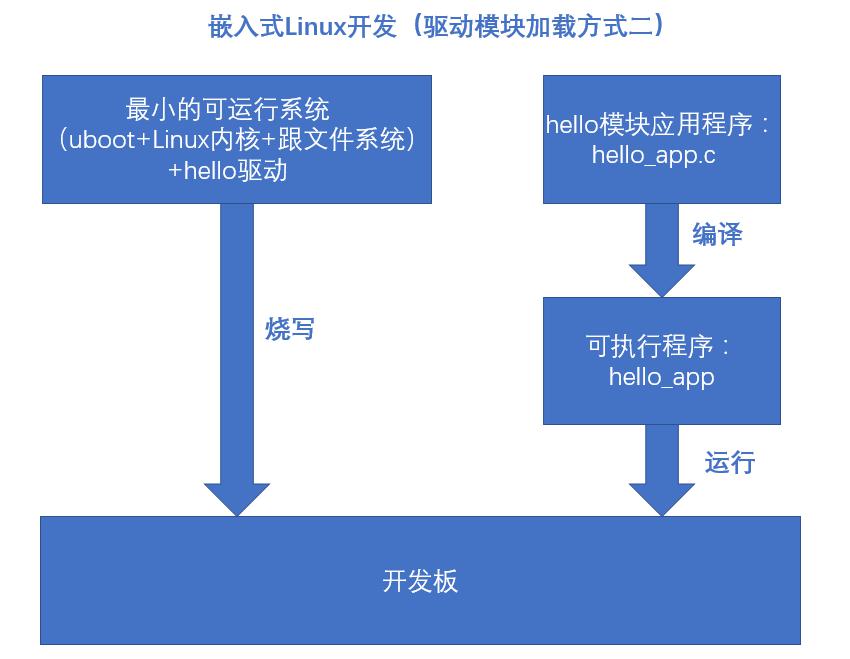
驱动模块的加载有两种方式:第一种方式是动态加载的方式,即驱动程序与内核分开编译,在内核运行的过程中加载;第二种方式是静态加载的方式,即驱动程序与内核一同编译,在内核启动过程中加载驱动。
在调试驱动阶段常常选用第一种方式,因为较为方便;在调试完成之后才采用第二种方式与内核一同编译。
STM32裸机开发与嵌入式Linux开发还有一点不同的就是:STM32裸机开发最终要烧到板子的常常只有一个文件(除开含有IAP程序的情况或者其它情况),嵌入式Linux就需要分开编译、烧写。
Linux字符设备驱动框架
我们先看一个图:
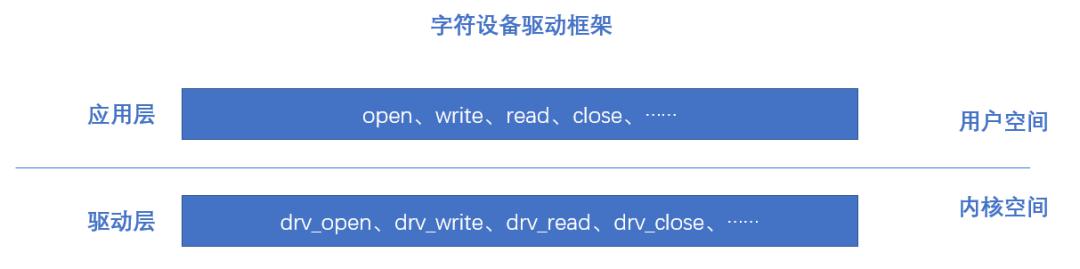
当我们的应用在调用open、close、write、read等函数时,为什么就能操控硬件设备。那是因为有驱动层在支撑着与硬件相关的操作,应用程序在调用打开、关闭、读、写等操作会触发相应的驱动层函数。
本篇笔记我们以hello驱动做分享,hello驱动属于字符设备。实现的驱动函数大概是怎么样的是有套路可寻的,这个套路在内核文件include/linux/fs.h中,这个文件中有如下结构体:
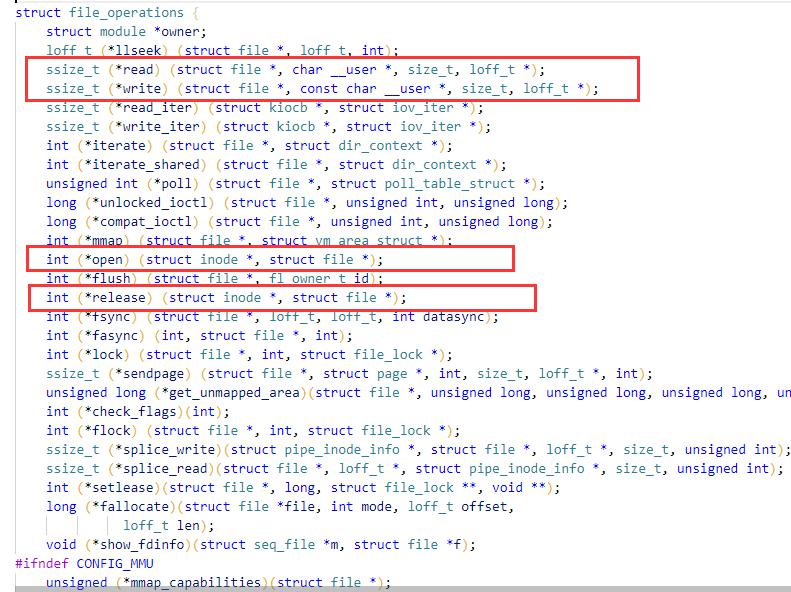
这个结构体里的成员都是些函数指针变量,我们需要根据实际的设备确定我们需要创建哪些驱动函数实体。比如我们的hello驱动的几个基本的函数(打开/关闭/读/写)可创建为(以下代码来自:百问网):
(1)打开操作
左右滑动查看全部代码>>>
static int hello_drv_open (struct inode *node, struct file *file)
{
  printk("%s %s line %d\n", __FILE__, __FUNCTION__, __LINE__);
  return 0;
}
打开函数的两个形参的类型要与struct file_operations结构体里open成员的形参类型一致,里面有一句打印语句,方便直观地看到驱动的运行过程。
关于函数指针,可阅读往期笔记:
(2)关闭操作
左右滑动查看全部代码>>>
static int hello_drv_close (struct inode *node, struct file *file)
{
  printk("%s %s line %d\n", __FILE__, __FUNCTION__, __LINE__);
  return 0;
}
(3)读操作
左右滑动查看全部代码>>>
static ssize_t hello_drv_read (struct file *file, char __user *buf, size_t size, loff_t *offset)
{
  int err;
  printk("%s %s line %d\n", __FILE__, __FUNCTION__, __LINE__);
  err = copy_to_user(buf, kernel_buf, MIN(1024, size));
  return MIN(1024, size);
}
copy_to_user函数的原型为:
左右滑动查看全部代码>>>
static inline int copy_to_user(void __user *to, const void *from, unsigned long n);
用该函数来读取内核空间(kernel_buf)的数据给到用户空间(buf)。另外,kernel_buf的定义如下:
static char kernel_buf[1024];
MIN为宏:
#define MIN(a, b) (a < b ? a : b)
把MIN(1024, size)作为copy_to_user的实参意在对拷贝的数据长度做限制(不能超出kernel_buf的大小)。
(4)写操作
左右滑动查看全部代码>>>
static ssize_t hello_drv_write (struct file *file, const char __user *buf, size_t size, loff_t *offset)
{
  int err;
  printk("%s %s line %d\n", __FILE__, __FUNCTION__, __LINE__);
  err = copy_from_user(kernel_buf, buf, MIN(1024, size));
  return MIN(1024, size);
}
copy_from_user函数的原型为:
左右滑动查看全部代码>>>
static inline int copy_from_user(void *to,const void __user volatile *from,unsigned long n)
用该函数来将用户空间(buf)的数据传送到内核空间(kernel_buf)。
有了这些驱动函数,就可以给到一个struct file_operations类型的结构体变量hello_drv,如:
static struct file_operations hello_drv =
{
    .owner   = THIS_MODULE,
    .open    = hello_drv_open,
    .read    = hello_drv_read,
    .write   = hello_drv_write,
    .release = hello_drv_close,
};
有些朋友可能没见过这种结构体初始化的形式(结构体成员前面加个.号),这是C99及C11标准提出的指定初始化器。具体可以去看往期笔记:【C语言笔记】结构体。
上面这个结构体变量hello_drv容纳了我们hello设备的驱动接口,最终我们要把这个hello_drv注册给Linux内核。
套路就是这样的:把驱动程序注册给内核,之后我们的应用程序就可以使用open/close/write/read等函数来操控我们的设备,Linux内核在这里起到一个中间人的作用,把两头的驱动与应用协调得很好。
我们前面说了驱动的装载方式之一的动态装载:把驱动程序编译成模块,再动态装载。
动态装载的体现就是开发板已经启动运行了Linux内核,我们通过开发板串口终端使用命令来装载驱动。装载驱动有两个命令,比如装载我们的hello驱动:
方法一:insmod hello_drv.ko 方法二:modprobe hello_drv.ko
其中modprobe命令不仅能装载当前驱动,而且还会同时装载与当前驱动相关的依赖驱动。有了转载就有卸载,也有两种方式:
方法一:rmmod hello_drv.ko 方法二:modprobe -r hello_drv.ko
其中modprobe命令不仅卸载当前驱动,也会同时卸载依赖驱动。
我们在串口终端调用装载与卸载驱动的命令,怎么就会执行装载与卸载操作。对应到驱动程序里我们有如下两个函数:
module_init(hello_init); //注册模块加载函数
module_exit(hello_exit); //注册模块卸载函数
这里加载与注册有用到hello_init、hello_exit函数,我们前面说的把hello_drv驱动注册到内核就是在hello_init函数里做,如:
左右滑动查看全部代码>>>
static int __init hello_init(void)
{
  int err;

  printk("%s %s line %d\n", __FILE__, __FUNCTION__, __LINE__);
    /* 注册hello驱动 */
  major = register_chrdev(0, 	/* 主设备号,为0则系统自动分配 */
                    "hello", 	/* 设备名称 */
                    &hello_drv); /* 驱动程序 */

  /* 下面操作是为了在/dev目录中生成一个hello设备节点 */
    /* 创建一个类 */
  hello_class = class_create(THIS_MODULE, "hello_class");
  err = PTR_ERR(hello_class);
  if (IS_ERR(hello_class)) {
    printk("%s %s line %d\n", __FILE__, __FUNCTION__, __LINE__);
    unregister_chrdev(major, "hello");
    return -1;
  }

    /* 创建设备,该设备创建在hello_class类下面 */
  device_create(hello_class, NULL, MKDEV(major, 0), NULL, "hello"); /* /dev/hello */

	return 0;
}
这里这个驱动程序入口函数hello_init中注册完驱动程序之后,同时通过下面连个创建操作来创建设备节点,即在/dev目录下生成设备文件。
据我了解,在之前版本的Linux内核中,设备节点需要手动创建,即通过创建节点命令mknod 在/dev目录下自己手动创建设备文件。既然已经有新的方式创建节点了,这里就不抠之前的内容了。
以上就是分享关于驱动一些内容,通过以上分析,我们知道,其是有套路(就是常说的驱动框架)可寻的,比如:
#include <linux/module.h>
#include <linux/kernel.h>
#include <linux/init.h>
/* 其她头文件...... */

/* 一些驱动函数 */
static ssize_t xxx_read (struct file *file, char __user *buf, size_t size, loff_t *offset)
{

}

static ssize_t xxx_write (struct file *file, const char __user *buf, size_t size, loff_t *offset)
{

}

static int xxx_open (struct inode *node, struct file *file)
{

}

static int xxx_close (struct inode *node, struct file *file)
{

}
/* 其它驱动函数...... */

/* 定义自己的驱动结构体 */
static struct file_operations xxx_drv = {
  .owner	 = THIS_MODULE,
  .open    = xxx_open,
  .read    = xxx_read,
  .write   = xxx_write,
  .release = xxx_close,
  /* 其它程序......... */
};

/* 驱动入口函数 */
static int __init xxx_init(void)
{

}

/* 驱动出口函数 */
static void __exit hello_exit(void)
{

}

/* 模块注册与卸载函数 */
module_init(xxx_init);
module_exit(xxx_exit);

/* 模块许可证(必选项) */
MODULE_LICENSE("GPL");
按照这样的套路来开发驱动程序的,有套路可寻那就比较好学习了,至少不会想着怎么起函数名而烦恼,哈哈 ,按套路来就好。
关于驱动的知识,这篇笔记中还可以展开很多内容,限于篇幅就不展开了。我们之后再进行学习、分享。
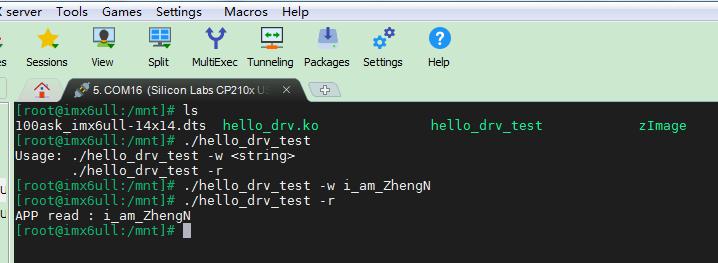
下面看一下测试程序/应用程序(hello_drv_test.c中的内容,以下代码来自:百问网):
左右滑动查看全部代码>>>
#include <sys/types.h>
#include <sys/stat.h>
#include <fcntl.h>
#include <unistd.h>
#include <stdio.h>
#include <string.h>

/*
 * ./hello_drv_test -w abc
 * ./hello_drv_test -r
 */
int main(int argc, char **argv)
{
  int fd;
  char buf[1024];
  int len;

  /* 1. 判断参数 */
  if (argc < 2)
  {
    printf("Usage: %s -w <string>\n", argv[0]);
    printf("       %s -r\n", argv[0]);
    return -1;
  }

  /* 2. 打开文件 */
  fd = open("/dev/hello", O_RDWR);
  if (fd == -1)
  {
    printf("can not open file /dev/hello\n");
    return -1;
  }

  /* 3. 写文件或读文件 */
  if ((0 == strcmp(argv[1], "-w")) && (argc == 3))
  {
    len = strlen(argv[2]) + 1;
    len = len < 1024 ? len : 1024;
    write(fd, argv[2], len);
  }
  else
  {
    len = read(fd, buf, 1024);
    buf[1023] = '\0';
    printf("APP read : %s\n", buf);
  }

  close(fd);

  return 0;
}
就是一些读写操作,跟我们学习文件操作是一样的。学单片机的有些朋友可能不太熟悉main函数的这种写法:
int main(int argc, char **argv)
main函数在C中有好几种写法(可查看往期笔记:main()函数有哪几种形式?),在Linux中常用这种写法。
argc与argv这两个值可以从终端(命令行)输入,因此这两个参数也被称为命令行参数。argc为命令行参数的个数,argv为字符串命令行参数的首地址。
最后,我们把编译生成的驱动模块hello_drv.ko与应用程序hello_drv_test放到共享目录录nfs_share中,同时在开发板终端挂载共享目录:
mount -t nfs -o nolock,vers=4 192.168.1.104:/home/book/nfs_share /mnt
关于ntf网络文件系统的使用可查看往期笔记:【Linux笔记】挂载网络文件系统。
然后我们通过insmod 命令装载驱动,但是出现了如下错误:
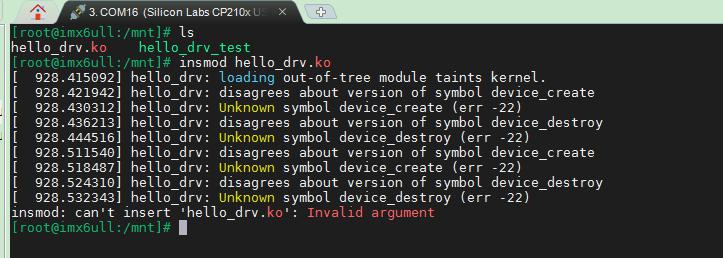
这是因为我们的驱动的编译依赖与内核版本,编译用的内核版本与当前开发板运行的内核的版本不一致所以会产生该错误。
重新编译内核,并把编译生成的Linux内核zImage映像文件与设备树文件*.dts文件拷贝到开发板根文件系统的/boot目录下,然后进行同步操作:
#mount -t nfs -o nolock,vers=4 192.168.1.114:/home/book/nfs_share /mnt
#cp /mnt/zImage /boot
#cp /mnt/.dtb /boot
#sync
下面是完整的hello驱动程序(来源:百问网):
左右滑动查看全部代码>>>
#include <linux/module.h>
#include <linux/fs.h>
#include <linux/errno.h>
#include <linux/miscdevice.h>
#include <linux/kernel.h>
#include <linux/major.h>
#include <linux/mutex.h>
#include <linux/proc_fs.h>
#include <linux/seq_file.h>
#include <linux/stat.h>
#include <linux/init.h>
#include <linux/device.h>
#include <linux/tty.h>
#include <linux/kmod.h>
#include <linux/gfp.h>

/* 1. 确定主设备号                                                                 */
static int major = 0;
static char kernel_buf[1024];
static struct class *hello_class;


#define MIN(a, b) (a < b ? a : b)

/* 3. 实现对应的open/read/write等函数,填入file_operations结构体                   */
static ssize_t hello_drv_read (struct file *file, char __user *buf, size_t size, loff_t *offset)
{
  int err;
  printk("%s %s line %d\n", __FILE__, __FUNCTION__, __LINE__);
  err = copy_to_user(buf, kernel_buf, MIN(1024, size));
  return MIN(1024, size);
}

static ssize_t hello_drv_write (struct file *file, const char __user *buf, size_t size, loff_t *offset)
{
  int err;
  printk("%s %s line %d\n", __FILE__, __FUNCTION__, __LINE__);
  err = copy_from_user(kernel_buf, buf, MIN(1024, size));
  return MIN(1024, size);
}

static int hello_drv_open (struct inode *node, struct file *file)
{
  printk("%s %s line %d\n", __FILE__, __FUNCTION__, __LINE__);
  return 0;
}

static int hello_drv_close (struct inode *node, struct file *file)
{
  printk("%s %s line %d\n", __FILE__, __FUNCTION__, __LINE__);
  return 0;
}

/* 2. 定义自己的file_operations结构体                                              */
static struct file_operations hello_drv =
{
  .owner	 = THIS_MODULE,
  .open    = hello_drv_open,
  .read    = hello_drv_read,
  .write   = hello_drv_write,
  .release = hello_drv_close,
};

/* 4. 把file_operations结构体告诉内核:注册驱动程序                                */
/* 5. 谁来注册驱动程序啊?得有一个入口函数:安装驱动程序时,就会去调用这个入口函数 */
static int __init hello_init(void)
{
  int err;

  printk("%s %s line %d\n", __FILE__, __FUNCTION__, __LINE__);
  major = register_chrdev(0, "hello", &hello_drv);  /* /dev/hello */


  hello_class = class_create(THIS_MODULE, "hello_class");
  err = PTR_ERR(hello_class);
  if (IS_ERR(hello_class)) {
    printk("%s %s line %d\n", __FILE__, __FUNCTION__, __LINE__);
    unregister_chrdev(major, "hello");
    return -1;
  }

  device_create(hello_class, NULL, MKDEV(major, 0), NULL, "hello"); /* /dev/hello */

  return 0;
}

/* 6. 有入口函数就应该有出口函数:卸载驱动程序时,就会去调用这个出口函数           */
static void __exit hello_exit(void)
{
  printk("%s %s line %d\n", __FILE__, __FUNCTION__, __LINE__);
  device_destroy(hello_class, MKDEV(major, 0));
  class_destroy(hello_class);
  unregister_chrdev(major, "hello");
}


/* 7. 其他完善:提供设备信息,自动创建设备节点                                     */

module_init(hello_init);
module_exit(hello_exit);

MODULE_LICENSE("GPL");
最后
嵌入式Linux的学习内容是很多的、坑也是很多的,需要很有耐心地去学习。以上笔记如有错误,欢迎指出!
如果觉得文章不错,转发、在看,也是我们继续更新得动力。
猜你喜欢:
基于Linux、C、JSON、Socket的编程实例(附代码)
【Linux笔记】pc机_开发板_ubuntu互ping实验

回复【加群】加入大杂烩交流群